How to add a new variant to an existing bundle in Simple Bundles 2.0
Adding a new variant to an existing bundle in Simple Bundles 2.0 is a straightforward process. Whether you're expanding size options, adding new colors, or introducing additional product combinations, this guide walks you through exactly what to do, step by step.
Note: If you're creating a bundle that will result in more than 100 variants, keep in mind that some Shopify themes and apps don’t support products with over 100 variants. Before adding or syncing large variant sets, double-check that your theme and any connected apps can handle higher variant counts to avoid display issues or incompatibilities.
Step 1: Add the new variant option in Shopify
The first step is to add the new variant directly to the bundle product in your Shopify Admin. Simple Bundles will not detect the new variant until it exists in Shopify first.
Go to your Shopify Admin
Navigate to Products and open the bundle product you want to update
Scroll down to the Variants section
Click the (+) Add option button
Enter the new variant name and add the desired values
Click Save
Example: The Moisture Cleanser Bundle currently has two variants, Style and Type, resulting in six total combinations. To add a third variant for Size (e.g. 100 mL, 200 mL), go to the
bundle product in Shopify, click (+) Add option, enter Size as the variant name, add 100 mL and 200 mL as values, and click Save. This will generate additional variant combinations that will need to be configured in Simple Bundles in the next steps.
Adding a variant in the product bundle in Shopify
Step 2: Open the Bundle Builder in Simple Bundles
Once the new variant is saved in Shopify, head over to the Simple Bundles app to update the bundle configuration.
In the Simple Bundles app, click Build Bundle
Select Simple Bundle
Choose Select existing bundle product
Search for and select your bundle product
Confirm the new variant combinations are visible in the list
Click Select to proceed
Example: After saving the Size variant in Shopify, navigate to Build Bundle > Simple Bundle > Select existing bundle product and select the Moisture Cleanser Bundle. You should now see the new Size combinations (e.g. Style / Type / 100 mL, Style / Type / 200 mL) listed alongside the existing ones.
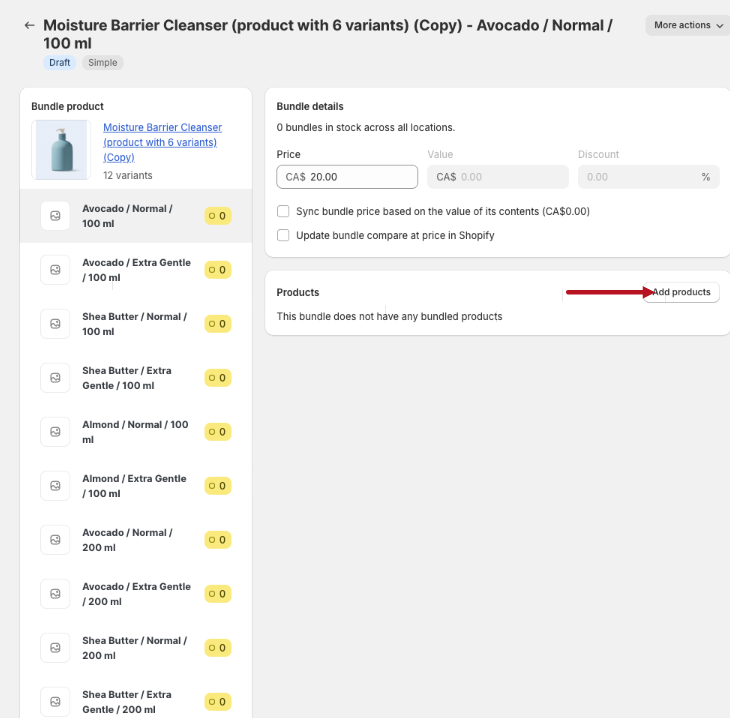
Adding the new variant combination in Simple Bundles
Adding the new variant combination in Simple Bundles
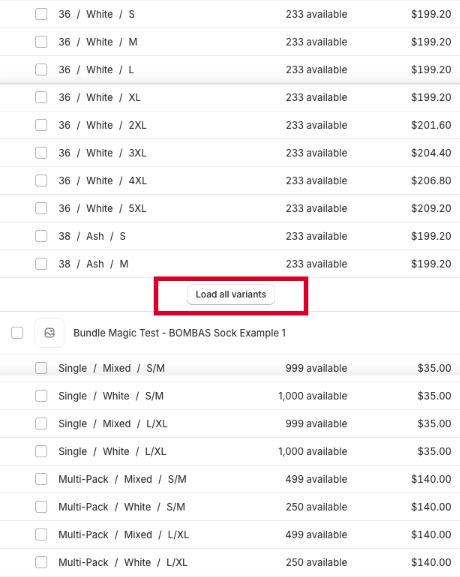
💡 Tip: If you have many variant combinations and don't see the newly added one, scroll down in the bundle builder and click Load variants. The new variant should appear there.
Step 3: Assign child SKUs to the new variant combinations
With the new variant combinations now visible in the bundle builder, you need to map the correct child SKUs to each new combination.
Locate the newly added variant combinations in the list
For each new combination, assign the corresponding child SKU(s)
Make sure every combination has a product assigned; unassigned combinations will not be purchasable
Click Save once all combinations are configured
Example: For the new Size combinations of the Moisture Cleanser Bundle, assign the correct child product variants for each combination. For example, the 100 mL version of each component for the 100 mL size, and the 200 mL version for the 200 mL size.
Adding the child skus to variant combination in SImple Bundles
Step 4: Verify the updated bundle
Before going live, test the bundle to make sure everything is working as expected.
Use the Test bundle button at the top of the bundle page in Simple Bundles
Select the new variant combination on the product page
Add it to cart and proceed through checkout
Confirm the correct child SKUs appear in the order
If you run into any trouble adding a new variant or need assistance with your bundle setup, don't hesitate to reach out to our team at hello@simplebundles.io!